|
We’ve done several projects related to spinning. From making primitive cordage with wild dogbane to re-purposing an old singer sewing machine into a proper spinning wheel. Spinning is fundamentally basic to making textiles, and textiles are pretty basic. But what is even more basic than spinning is the preparation of the fiber for spinning. Most hobby spinners these days and for the last few hundred years have used wool cards for the job of preparing their fiber for spinning. These are large square paddles with thousands of tiny hooked needles placed precisely in a cloth that holds them at the appropriate angle to disentangle your fiber into a homogeneous mass. Cards work beautifully, but I am not satisfied with cards. I want to know the most basic form of spinning and fiber preparation that still works. Wool cards, and even wool combs for that matter, fail this test because they require a sophisticated tool that in turn requires iron. We have been spinning for a much longer time (thousands of years) than we have been making metal. Which leaves me with the question: Is there a way to prepare fiber that does not involve metal teeth? Yes. In India and other cotton spinning cultures, people use a vibrating bow string to fluff up and homogenize their fiber. This fascinates me, because this level of technology is relatively easy to replicate. At least in theory. Here are some illustrations of bow carding: From a Wikipedia article on Carding. Notice the man on the left using the bow over slats on the fiber. Not sure if this is just to clean the fiber, but it looks like there are no other fiber preparation tools. From an article on traditional hat making techniques: http://trulyhats.com/1666-hatmaking-process.html
One technique that seems to fill a similar role is “willowing” or “wulleying.” This is a process in which one beats the wool with thin willow rods to… maybe prepare it for spinning? My attempt showed that it is very good for fluffing up the fibers and for removing vegetable matter, but further testing is needed before I will know if this can be a reliable alternative to carding. I would also like to try bow carding so as to compare the two. Video demonstrating willowing wool: https://www.youtube.com/watch?v=xsnOTTTy1iE An blog post by Josefin Waltin on willowing: https://waltin.se/josefinwaltinspinner/willowing-wool/ A FANTASTIC video demonstrating low tech cotton prep and spinning: https://www.youtube.com/watch?v=-cx0C84Pdl8 (Note that they beat the cotton with a bow string in a basket. This is brilliant since it allows the vegetable matter to fall through the gaps in the basket. The video also shows preparing the fluffed fiber into the preparation known as “puni”). Some questions I am left with: Does the staple length of the fiber dictate whether bow carding will work? As in, does this only work with very short fibers like cotton, but not with mid length wool or longer fibers? Does the amount of grease in the wool affect whether or not it works? (I’ve seen videos of Mongolian Felters using a technique like willowing for making a felting batt. https://www.youtube.com/watch?v=gJ0uojUHYdA ) If it does work, how fast is it compared to carding? How large a batch can be done at once? When did wool cards become common and how were they made at first? Was willowing used in conjunction with other techniques just as a way to open the fiber and drop vegetable matter, or was it viable as a way to prepare fiber for spinning? JB
0 Comments
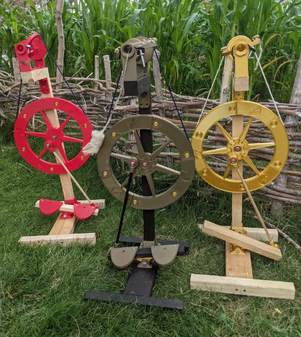
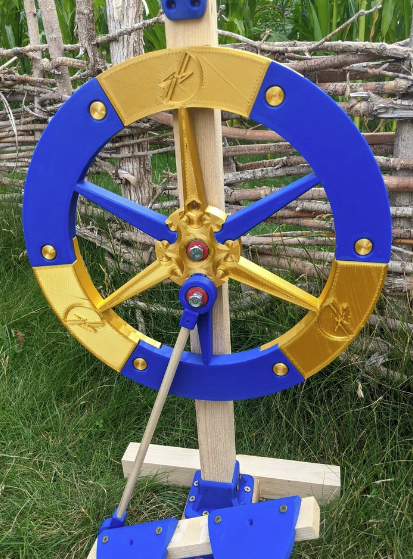
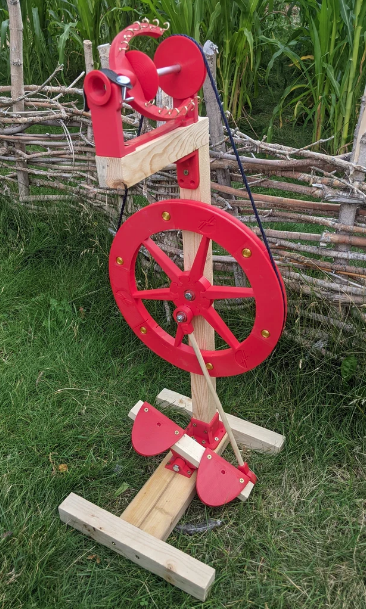
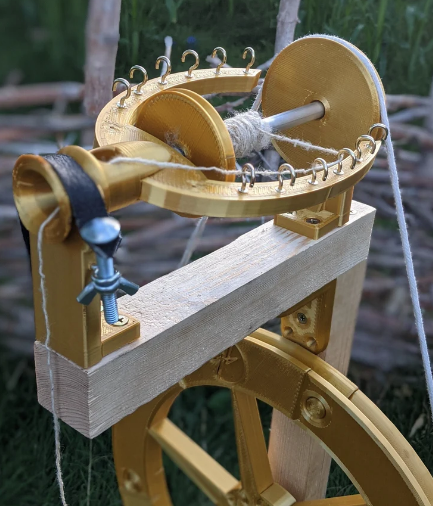
Guys. It's finally here. The full-sized spinning wheel is live in our Etsy shop. Let me tell you: it was a brutally fulfilling prototyping process. Skeeter, D'artagnan, and Ivan (our 3D printers) printed more than 60 hours of spokes, bobbins, and whorls. Some parts were too small. Some suffered bed shift or other g-code deformities. But, in the end, Irish swears and constant code modifications prevailed. In all of its glory, I present the full-sized, 3D-printed, Irish Tension Good and Basic Spinning Wheel. I'm taking a moment to bask. Go ahead and move on. The wood on this prototype is unfinished. Joseph was too excited to get the thing assembled and didn't take time to finish the wood, which I would probably want to do if I planned to make this my permanent wheel. A good stain would do nicely, I think. I favor the Kona stain from Rust-Oleum, which would provide a lovely, dark contrast to the gold filament. (That's the bronze one in the middle with the dark wood.) To match the red filament, I'm imagining something with a cherry base. Maybe something like Red Oak, again from Rust-Oleum? (All of these stains, incidentally, should be available via your local hardware store or Walmart.)
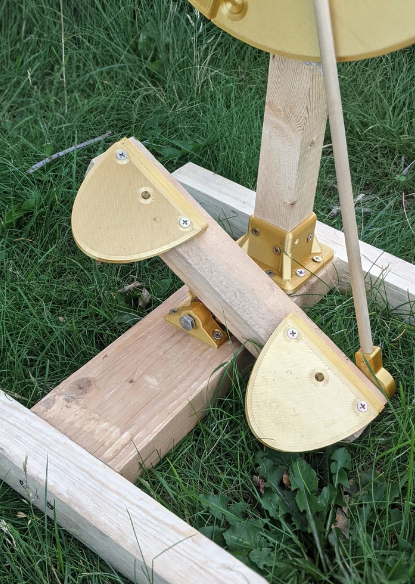
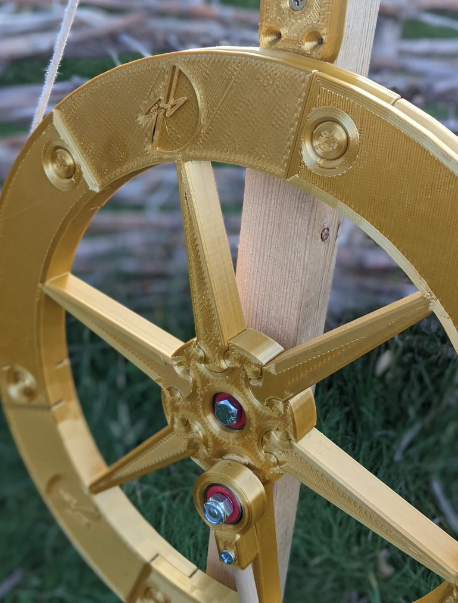
A little bit more about nuts and bolts. Literally. As he mentions in the listing, this kit does not include a 2-inch 5/16 lag bolt, a 1-inch 5/16 lag bolt, a 3.5-inch 5/16 bolt, a 1.5-inch 5/16 bolt, 2 5/16 lock nuts, misc. washers, and wood screws for the wooden components. You will need to purchase these for yourself. I'm estimating that full assembly time should run somewhere between 30 minutes to an hour, depending on build experience. It might, if you're very methodical like me and check the instructions twice per step, take up to 2 hours. The function itself is beautifully simple. The spinning wheel moves with two rotating pedals. The pedals push a shaft that spins the wheel. The wheel spins the bobbin wheel (see that white or black cord), which then interacts with the flyer. The hooks hold the thread in place while. The piece of black leather is part of the tensioner. And guess what? The whole thing works! (Joseph included a video snippet in the product listing, which I've watched gleefully several times.) He has successfully spun wool thread/yarn from an unprocessed fleece hanging out in my garage. To the bobbin you go, wanton fleece! The kit will--and does--come with loose pieces. The main wheel, for example, is 13 pieces: 6 spokes, 1 hub, and 6 pegs. If you look closely at the picture below, you can see where the spokes connect to the hub, and also where the pegs connect the spoke pieces. Joseph doesn't yet have a build tutorial available. When he does, he'll release it on his Youtube channel, Good and Basic. He'll also release a complete parts list, along with suggestions for cuts. I will say that he built almost the entire wood frame using 1 2x2x8 board, a slab of 2x4 (for the base), and a slab of 1x2 (for the pedals). It took him 30 minutes to put everything together, including cutting the wood. He did know where everything went, which helped, and he also had a saw and a drill. I honestly feel that, with a little bit of reference from the picture above, you'd be able to put together your kit. It's really not that complicated. (If you doubt me, feel free to snort in derision. I still believe in you.) However, like I said, Joseph is working on written instructions and a Youtube tutorial as additional guides. If you have any questions about the spinning wheel or other products, please let us know. Joseph will probably answer most of the questions about product development and design, but if I can answer questions, I will. Let the spinning begin! Welcome to the Good and Basic Etsy Shop!
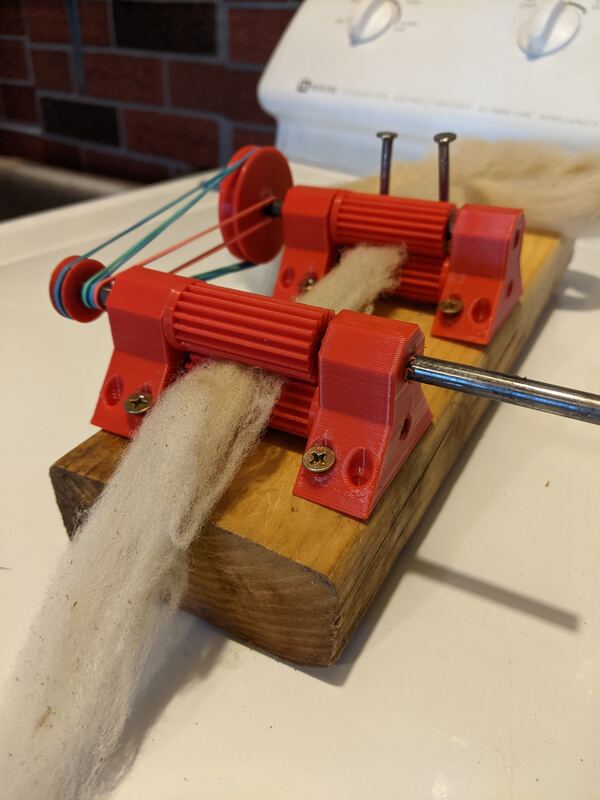
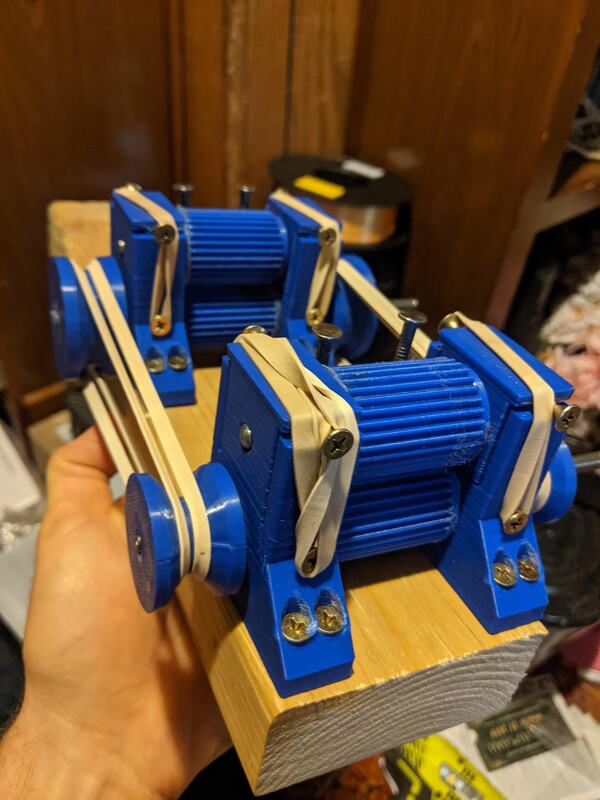
We have recently released the Good and Basic spinning wheel on the shop in two variants: a complete kit that comes with all the 3D-printed parts, all the pre-cut wood parts, and all the nuts, bolts and other fasteners to put it together for $275, and a kit that includes only the 3D-printed parts for $135. I believe this is now the least-expensive castle wheel anywhere on the market. More details on that project in the next post. Designing, prototyping, and reprototyping this wheel to make it high-quality, low-cost, and easy to assemble took the better part of 3 months and a fair bit of inspiration. I am grateful to see the printed parts click together and to see the listings on Etsy in all the color variations. As always, I have released the design files for free on Thingiverse as my contribution to the community. The files and the assembly instructions are free to download and build under a Creative Commons Non-Commercial license. That means that you are welcome to build one for yourself, but I remain the only one who can legally sell them. With the wheel done, I have turned to three other design projects. I have prototyped a flax hackle at the request of a member of our community which could be production-ready in a week or so, and I just finished the first prototype of a 3D-printed ball winder. But the project that is really getting me excited lately is my roving machine or Belni. This machine, when done, will enable you to create your own consistent roving at home! I took inspiration for this project from roving machines that I have seen made in India and more especially from the Ambar Belni, a device that people would use to create the thin cotton slivers that were spun on the Ambar Charkha. This project is aimed at eventually producing a home-scale automatic spinning machine based on the ideas in the Ambar Charkha. It’s hard to overstate how excited I get about that machine. The Ambar Charkha represented a fusion of the best parts of the local production ideals of the Swadeshi movement and the best parts of industry and technology. Rather than using technology to replace people and local skill with centralized factories, the Ambar Charkha, like the washing machine, singer sewing machine, and home computer, enhanced the productive power of the home. This decentralized empowerment of people to take charge of their own things is what gets me excited about 3D printing, learning old-fashioned skills, and sharing what I learn in the process. I hope you will check in to the Good and Basic Etsy shop and Youtube channel often to share the journey with us. If you are excited about our products or videos, please tell a friend about them. We appreciate your help getting the word out. Joseph Bjork Good and Basic. The photos are of the Belni mark 2 and mark 3 respectively. 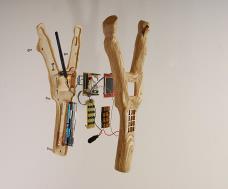 So you’re lost in the woods and hard at work building (insert your name here)-andria when you realize that you could really use a slingshot to catch dinner. No problem. A slingshot is a pretty simple piece of technology after all. You spend some time searching for a good “Y-shaped” stick and use a little piece of leather, some leaves, or a piece of your sock to make a pouch. So what about the rubber-bands? When you consider the levels of various technologies, there are more things to take into account than the simplicity of the machine or the number of parts. In the case of a sling shot, there are only three parts: a shaped stick, a patch of leather, and two bands of rubber. Sounds simple right? This should be considered a basic, primitive technology. But there is a catch. If the wilderness you are lost in resides in part of the English speaking world, you won’t have access to rubber for a long long time. Rubber is essentially congealed tree sap, but the trees it grows on are now almost exclusively grown in south-east Asia. That’s a long way from land-locked Utah. The raw resource needed to build a slingshot is unavailable to us here. So if we were to place the slingshot on a technology scale, where would it fall? Well, before we can build a slingshot, we need trade routes that can safely make it to Indonesia and back. That means we need the science of navigation to be top notch to cross the Pacific Ocean. Navigation requires astronomy, charts, possibly a compass, and all that is just to know where to go! Then we get to the ship itself. Building a ship to cross oceans with a cargo is no mean feat. You need advanced woodworking techniques (iron tools would really help), textile technology for sails (requiring looms, spinning, cultivation of fiber crops, and a whole lot of spare time, which means some division of labor), and overland transportation for the lumber and supplies to the shipyard. You are not going to do all this yourself in one lifetime, so you would need to organize a society with hundreds of skilled laborers willing to work together on this massive project. This means that you not only need a whole lot of technology and a lot of time to build a slingshot, but also an army. How advanced then is a slingshot? That depends where you live. If you are reading this in Indonesia, it’s pretty basic. If you live in Utah on the other hand, a slingshot is higher technology than high-seas navigation and a steam engine. So as you look at that tasty squirrel on the branch and wish for a slingshot, what are your options? You can build an entire civilization to solve the problem one way, or you can spend 30 minutes making a shepherd's sling to slay that bushy-tailed goliath. You could also make snares or traps from string and bits of wood or even an atlatl or bow and arrow. Those solutions solve the same problem, but at a much lower level of technology and, therefore, at a much lower cost to you. You get to eat squirrel now, and if you really want to establish sea trade with Thailand, you are welcome to do so at your leisure. But let's say you have a set of problems that really need rubber and no currently-existing substitute will do. Such was the problem the United States faced at the beginning of World War 2. Numerous military-essential pieces of gear required rubber, including vehicle tires, combat boots, seals in machinery, machine belts, and much much more. Without rubber, the US could not fight, and Japan secured a near monopoly of the natural rubber supply as they conquered much of south-east Asia. As they say, necessity is the mother of invention, and invent they did. Though the rubber tree, Hevea Brasiliensis, is the best known and most economical source of natural latex, latex is actually produced by numerous plants at varying quantities and levels of quality. In the 20s and 30s, Thomas Edison, Harvey Firestone, and Henry Ford became concerned about a potential shortage of rubber and began the research into alternatives. Ford commissioned a rubber plantation in South America modeled on an American town, and Edison tested thousands of plant species before settling on common goldenrod as an alternative source for the precious latex. At one point, even George Washington Carver consulted on the project. Edison bred gigantic goldenrod plants with superior latex content, and the Model T Edison owned rode on goldenrod-rubber tires. Eventually, for reasons I have yet to research in depth, the project slowed and the development of these high-latex goldenrod plants stopped. During the war, the US discovered that a sagebrush-like plant near the Mexican border called guayule could be processed for rubber and they also developed synthetic rubber that could cover some, but not all, of the applications for which they so desperately needed natural rubber. Russia did similar research and developed a variety of dandelion which could supplement their needs for rubber. (The sticky white sap from a dandelion is a solution of latex and water.) What these research projects effectively did, was try to find a more economical, easier to access rubber, one which the US could access with their current level of technology and the resources they currently had access to. The synthetic rubber requires massive chemical plants and access to oil wells, both of which are quite high-tech. But what interests me about the guayule and goldenrod research, is that they both lowered the level of technology someone in Utah needs to make rubber from scratch. They radically reduced the number of levels between a stone-age hunter-gatherer and a slingshot. This kind of research interests me. It is like a short-circuit, where the path of least resistance is suddenly shorter than it once was. All of this history fascinates me. One day soon, I would like to put what I have learned into practice by making some rubber from scratch from plants available in my area, probably from dandelions unless I can find some guayule. I have some vague dreams of making the bands for a slingshot, and maybe even sending them to Joerg Sprave of the Slingshot Channel. That's the dream anyway. In every problem, such as downing that squirrel on the branch, customize your solutions to the local situation. The more you know, the more opportunities you will be able to capitalize on. Such knowledge creates options and will allow you to choose the simplest and easiest ways to accomplish your goals. Further Reading on Rubber and Rubber-Tree alternatives: In Search of Thomas Edison’s Botanical Treasures – Science Talk Archive (nybg.org) US2453858A - Process for obtaining rubber from goldenrod leaves - Google Patents Natural rubber from dandelions (phys.org) By JB.
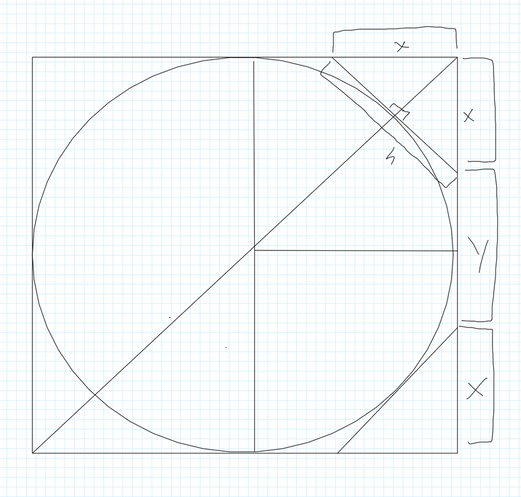
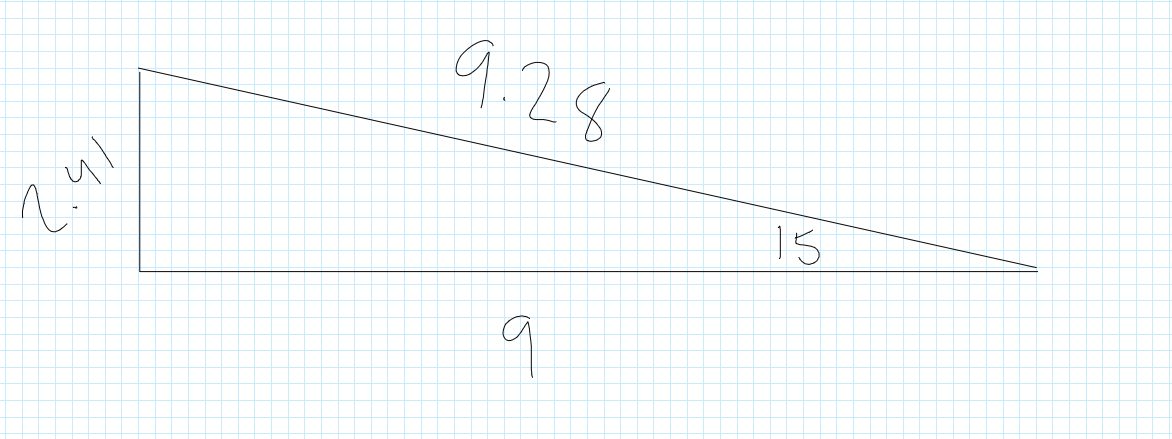
The article which introduced me to the idea that Ancient Romans used ceramic discs for wiping: https://www.dailymail.co.uk/sciencetech/article-2264464/They-bit-scratchy-The-ceramic-gaming-pieces-new-research-claims-Roman-equivalent-loo-roll.html The scholarly article that found mineralized feces on some ceramic discs from a Roman site: Charlier, Philippe & Brun, Luc & Pretre, Clarisse & Huynh-Charlier, Isabelle. (2012). CHRISTMAS 2012: Toilet hygiene in the classical era. BMJ (Clinical research ed.) 345. e8287. 10.1136/bmj.e8287. Amazon Affiliate link to some planter pot saucers which I have put to a similar purpose: https://amzn.to/2QrLv9q (These would make a fantastic prank gift if wrapped as a white cylinder and labeled as "Roman Toilet Paper.") An article on the mysterious repurposed ceramic discs found in some Native American archeological sites (Game pieces, or possibly used for the same purpose?): https://www.peachstatearchaeologicalsociety.org/index.php/22-game-stones/145-ceramic-discoidals 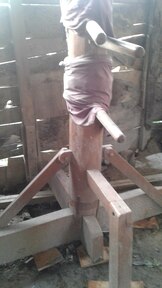 What It Is And Where It Came From A Wing Chun Dummy (or Muk Yan Jong, “Wooden Man Post”) is a traditional Chinese kung fu training instrument popularized by Ip Man and the Wing Chun school of kung fu. In its typical form, it has a large vertical post with two arms emerging at offset angles, a single arm set straight out from the post, and a bent-L-shaped leg near the base. This design is intended to roughly simulate the form of a human opponent and allow a kung fu student to practice techniques under conditions with physical resistance and feedback. 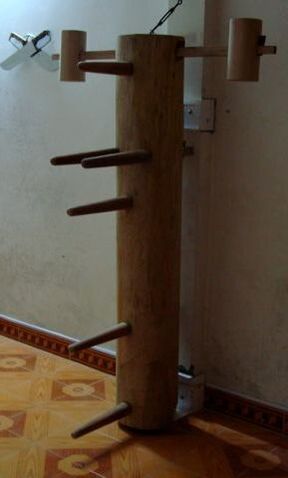 Although the modern form was popularized by Ip Man and the Wing Chun school of kung fu in the twentieth century, wooden dummies like it have existed for much longer. Legendary origins go back to the Shaolin temple, with a variety of stories and actual artifacts spanning past centuries. Different designs would use a different base or frame mechanism to secure the post, and different numbers or types of arms and legs. One key feature of the base/frame mechanism seems to have been some kind of slight flexibility or “give” so that, when struck, the dummy would respond similarly to a human opponent. One historical solution was to sink the post into an oversized hole in the ground and fill the hole with plant fibers or gravel. The modern design uses a frame with two relatively narrow struts placed horizontally through or behind the post and secured to a wall or a larger frame. Ip Man apparently favored this design. 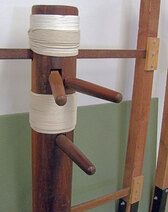 Build Instructions I decided to build my own since retail dummies are somewhat expensive. You can watch the full process here; on this blog post I’ll show diagrams and formulas that will be helpful. I used these instructions but they are inspecific on several important details. I’ll mostly limit my explanation here to those things not explained well or included in that linked PDF, since they are quite good and a great starting point. Body/Post After a little research, I learned that it would be both more difficult and more expensive to buy an actual post, so I decided to build a post by laminating boards together and truncating the edges. The final dimensions of the post should be 5’ tall and 9” in diameter. I glued six ten-foot 2x10s together with Wood Titebond 3, cut the post down to 5’, and then set to work making it in an octagon. In theory six 2x10s should make a block 12 inches by 10 inches. However, the stated dimensions of lumber are larger than the actual dimensions. A 2x10 is actually more like a 1½ by 9¼. Six added together make a 9x9¼ square post—an acceptable level of precision to me. Now, how to make it an octagon with even sides? Imagine a cross section of the square post. I’ve inscribed a circle with diameter and radius lines and a diagonal line from corner to corner for reference. What interests us is the corner specifically. If a line is drawn tangentially to the circle, we create a triangle that, if cut off from the square post, will create a perfect octagon. That triangle has one side ‘h’ and two sides ‘x’. If we find the value of ‘x’, we can know where to begin the truncating cut. Notice that each side of the square must be 2 ’x’ plus some other value. We’ll define it as ‘y’. Notice also that ‘y’ must be the value of ‘h’, since we are trying to create a perfect octagon. A little bit of geometry and I cam out with the numbers x = 2.64” and y = 3.72”. I converted those from decimal to imperial as 2⅝” and 3¾”. The angle of the cut, of course, is 45 degrees (half of a 90 degree square angle); I used a handheld circular saw. The final product is a 5’ tall pillar in the shape of an octagon. Arms I built the arms out of 4x4s. The length of the 4x4 is defined in the following way: the arm typically extends out from the body about 12”, plus another ~9” are required for the shaft through the body. I rounded up to ~24 inches and I would recommend doing so; you can always cut it shorter but you can’t cut it longer. The shank of each arm is 1.5 inches square and that is simple enough to do: measure 1.5 inches and cut with a band saw, jig saw, etc. The arm itself is a little trickier as it is circular and ideally should taper. A taper (and a cylindrical shape) can be achieved in a similar way that the post was turned into an octagon. Referring to the cross-section of the post above, but treating it as a cross-section of the arm, use the following equations: x/y = 0.71 2x + y = length of square side The two equations can be used in conjunction to generate measurements for an octagon out of any square pillar. In this case we have a 2.5” diameter root of the arm and a 1.5” diameter tip. We can treat both those measurements as the length of the square sides, and using the equations above, we get approximately x = ¾” and y = 1” for the root and x = 7/16” and y = ⅝” for the tip. Marking this on each arm and drawing lines from root to tip gives us a diagram like this on each side of the square arm 4x4: Simply cut in a similar way to the post, but following the taper, and you have an octagonal tapering arm. Sand to your preferred smoothness. Remember to cut the shank offset to the side on two of the arms and dead center on the third arm! This is illustrated well in the PDF linked at the beginning of the instructions on this blog post. Legs The instructions are given in the PDF linked earlier. I glued the pieces together with Wood Titebond III. I built the leg with an extra long shank and extra long leg piece so that I could manually cut it to size later using trial and error. 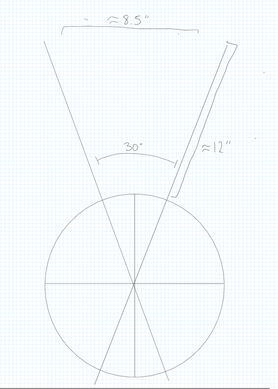 Post Holes Cutting four holes in the post was probably the trickiest part of the whole project. The center arm hole is fairly simple and its illustrated well in the PDF mentioned above. The offset arms and the legs are significantly more difficult because of their angles. At what angle should the offset arms be placed? According to the PDF mentioned above the tips of the offset arms should be ~8.5” apart. We also know that the arms themselves are about 16.5” from their tips to where they cross at the center of the post (12” + 4.5”). After some geometry I got 30 degrees from one arm to the other, or 15 degrees from the center to each arm. The linked PDF describes an excellent way to make a homemade protractor. Once you’ve done this, you can easily measure ~30 degrees on the front of the dummy and use the protractor to mark the holes on the back side. Alternately, if your protractor is long enough, you can simply measure the 8.5” distance between the protractor arms at 12” out from the body and use that angle. The leg hole should be similarly angled at about 15 degrees. Instead of using the protractor, I calculated this using the Pythagorean theorem and verified it with a sin() calculation. So, 2.41” up from the level of the hole in the front is the hole in the back. From here it was just a question of gouging and drilling the holes as I had marked them. It took a long time, but worked fairly well. Remember that the holes should be slightly larger than the arm/leg shanks so that they can be easily inserted and shift a little during practice.
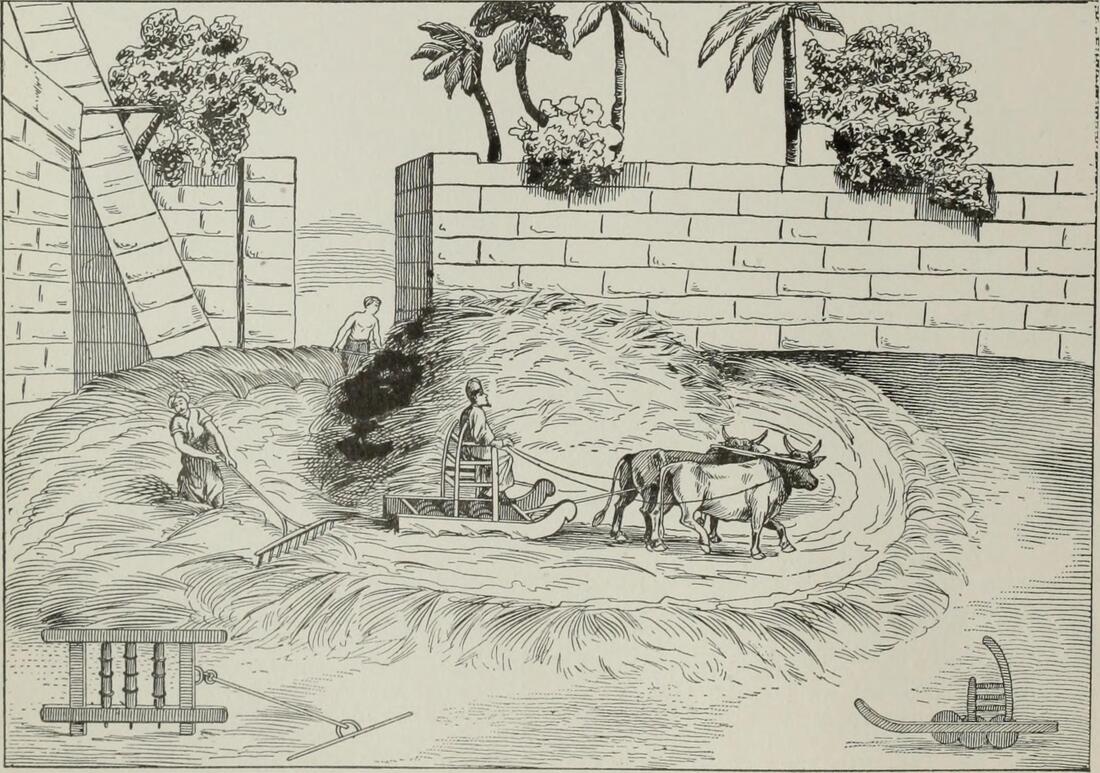
Base The base is fairly self-explanatory if you watch the attached video; it’s simply a set of 2x4s laid crossways into a crosshatch formation. Remember that the dimensions of a 2x4 are closer 1½” to 3½” and cut them accordingly. Conclusion So, there you have it. Total cost was about $70 in lumber (the 2x4s and 4x4s were scrap) and ~$15 in glue. Not bad at all compared to the retail price of these things, even if I had had to buy extra lumber. If anything is unclear leave a comment below and I’ll try to clear it up. I won’t include any drills here, but it’s easy to find basic drills to practice on your newly built dummy. Happy building and practicing! JF 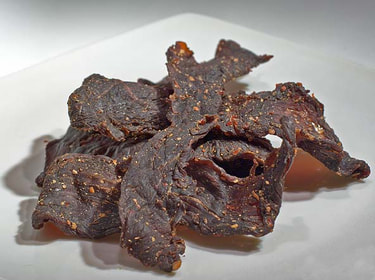 Some of my beef jerky. Some of my beef jerky. This last summer, I (JF) made beef jerky for the first time. Not only is dried meat delicious, but it's fascinating because it's a way to preserve meat without requiring refrigeration. To me, that's absolute witch science: all my life I've been told that meat spoils quickly and, while food safety is important, there's a lot of wiggle room and interesting options for preserving meat without refrigeration. Here's the basics: Bacteria that spoil food are kind of like humans--they don't like it too hot, they don't like it too cold, they need air to breathe, something to feed on, and a little bit of water. If you want to inhibit the growth of these food-spoiling bacteria, you need to manipulate one or more of these variables and deprive them of what they need to live. Temperature is the most common: if you buy hamburger patties from the store, you'll refrigerate them to slow down bacterial growth, then throw it on the grill to kill any bacteria with heat. The magic of dehydration is that it deprives the bacteria of moisture, removing the urgent need to cook or chill the meat (so, more like bacteria famine than the bacteria ice age in the freezer or bacteria genocide on the grill). So, how to remove that moisture? The two most common tools are heat and air movement. The two combined are especially effective (which is why most food dehydrators have a fan). Although the USDA recommends heating beef to 160 degrees Fahrenheit to kill bacteria, it's more typical to dry it between 130 and 160 degrees (cooking a steak to 130-140 degrees F internal temperature is rare). Heat and air movement are such simple ingredients that you'll soon realize you may not need a "real" food dehydrator: you can dry out meet in an oven, over a fire, in a solar cooker, or just out in the sun. Or maybe, in a car on a hot day… There are still food safety risks even after drying. Remember, drying doesn't kill bacteria, it only inhibits their growth. There may still be dangerous bacteria on the meat before or after drying, and the growth of that bacteria will accelerate if you leave your dried jerky in a warm, moist, or oxygen-rich environment. Remember, the danger zone for food spoilage is 40-140 degrees Fahrenheit. So, it also goes without saying that any meat drying or processing is a thing you do at your own risk. To me, though, that's one of the coolest things about making beef jerky: You take responsibility into your own hands. Can you do that badly? Of course. But to me it's definitely worth it--especially because beef jerky is so delicious. Plus, it makes you a master of beef jerky witch science. 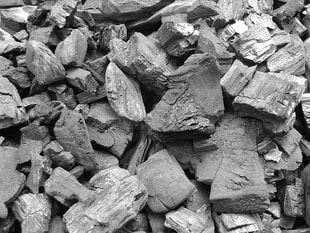 Charcoal is a substance that we use a lot of on our channel, and we're not alone. You've probably used it for a barbecue and lump charcoal used to be the fuel of choice for industrial processes before the advent of coal and coke. So what is charcoal and how is it made? Chemically speaking, charcoal is almost pure carbon. It's made from wood by driving off everything in the wood that isn't carbon, e.g., water, tar, and volatile gases. This process, induced by heat between 600-1100 degrees Fahrenheit, is called pyrolysis. The product is charcoal. It's worth noting that the pillow-shaped briquettes you buy in a grocery store are not pure carbon; they have a binder and other additives (hence why they leave so much ash behind after burning; good quality charcoal should barely leave any ash at all when burnt). So how do you make it? Again, pyrolysis happens around 600-1100 degrees Fahrenheit. Obviously this occurs partially whenever a wood fire is lit, so you can make charcoal just by lighting a wood fire and collecting the charcoal that is left afterwards (what's called the "direct" method). However, it also isn't terribly efficient since large quantities of charcoal are made and then burned in the same fire. Another option is the "indirect" method: seal wood into a nearly airtight container and bake it inside a second fire (you may have made charcloth in a similar way using a small metal tin and your kitchen oven). This leaves all the wood in the sealed chamber as charcoal (minus the volume of water, tar, and gases). However, it requires a secondary fire, so although it yields a cleaner "harvest" of charcoal, it still seems to lack some desired efficiency. Whether you use the direct or retort method, your charcoal making venture basically comes down to two variables: 1) heat creation/retention and 2) oxygen. Unless you cut the oxygen flow to the fire down to nothing or near nothing, the wood will pyrolyze into charcoal and then combust and burn away (i.e., what happens in a normal fire). And whatever you do, there has to be some kind of heat source to raise the temperature of the wood between 600-1100 degrees Fahrenheit and then keep it there for a long enough period of time to complete pyrolysis. How you accomplish those two tasks is up to you, but they both have to occur. On the channel, we've used an old barbecue and a 55-gallon drum as ovens and retorts for the direct and indirect methods respectively. The 55-gallon drum we use has a steel pipe flue welded onto it that in theory should allow the volatile gases to exit the retort then combust and contribute more heat to the retort, but we've had mixed results with the flue. Even a simple earth chamber, above or below ground, can provide the insulation to retain heat as well as cut off oxygen flow. Remember the two golden rules: Heat/insulation and oxygen flow. Go and may the charcoal be with you.  This post details how we threshed grain last summer (2018) and looks forward to how we might try it in the future. Last summer we harvested wild rye from the side of the road. A couple notes on harvesting: Wait for the grain seeds to be hard (not squishy or susceptible to dents) before harvesting. This could be early/mid-July or around there. Scythes are good; billhooks are good; anything that cuts the stalks for collection. Ideally you should let the stalks dry out as well; apparently that’s the original reason for packing grain in sheaves and leaving them in the field. Presumably it also helps avoid ergot (definitely a thing to watch out for). The next step, of course, is threshing: knocking the grain seeds (food) free from the plant stalks (not food). Historically this has been done in a variety of ways including trampling out the grain on the floor by human or animal power, culminating in today’s large combine harvesters (‘combine’ because they reap, thresh, and winnow all at once). We’re interested in something that is good and basic. It needs to be relatively simple, relatively efficient, and good for relatively small batches. Here is one small machine, here is another with more detailed build instructions. The drill-and-chain thresher looks very efficient and we’re looking forward to trying that out. This machine threshes and winnows at the same time, but there are no build instructions. Putting the seed heads in a pillowcase and beating them is an interesting idea that looks like it could work. You can even just rub the stalk heads through your hands (likely more effective for tiny amaranth seeds than larger wheat/rye seeds, also more time consuming). Virtually any kind of percussion/rubbing will likely work.
|




 RSS Feed
